Automatic Permissions

You can use automatic permission settings to pass permissions for an object when the object has a property value, object type or class that uses automatic permissions. The object receives automatic permissions when a value with automatic permissions specified is added for the object.

Video: Automatic Permissions
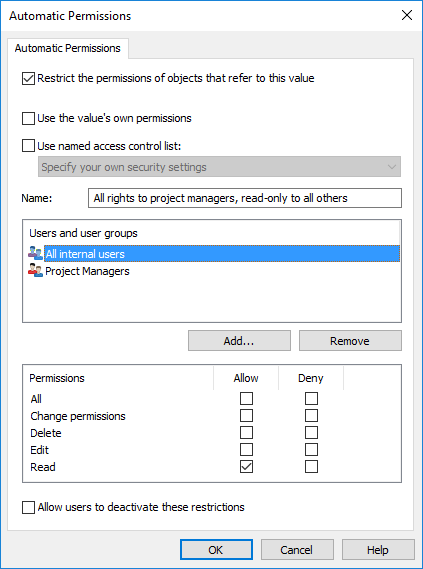
The "Automatic Permissions" dialog for a value list item.

In the above example, automatic permissions have been activated. Read-only access has been granted to all users and a separate access to project managers.

Restrict the permissions of objects that refer to this value

Activate the function Restrict the permissions of objects that refer to this value when you want to activate the automatic permissions.

Use the value's own permissions

You can use the permissions of a value or object, such as a project, as automatic permissions.

In this type of case, for example, a plan for a house project would inherit the permissions of the project that is associated with the plan. For example, the House project Haven may have its own permissions that allow access for the project manager and project group only. When this project is associated with the house project plan, the same permissions are granted to the plan. The automatic permissions are then the same as the project's own permissions, so definition of separate automatic permissions for the project is not necessary.

Note: Automatic permissions are not inherited indirectly. Let's say we have the object "Hugh Brent" that inherits automatic permissions via the "Look Up Company" property. These permissions are no longer inherited by the "CRM Application Development" object that has "Hugh Brent" as one of its property values.

Name

Give as descriptive a name as possible to the automatic permissions set, because this information will be displayed in the client software.

Specify permissions

You can then specify the automatic permissions that are always activated automatically for the object when a value, object, or class using automatic permissions is added to the object's metadata.

For more information on permissions, see Permissions. Also refer to the specification of pseudo-users in Pseudo-users.

Note: If you do not explicitly allow any permissions, using this kind of value or object restricts all permissions for the final object.

Allow users to deactivate these restrictions

You can also specify whether the users are allowed to deactivate the automatic permission restrictions created via this value, so that the users can delete the preset automatic permissions if they so desire.

Remarks about using automatic permissions

The specified value providing automatic permissions must be selected on the metadata card for the explicit property definition for which you have enabled automatic permissions. See Verifying Which Properties Have Automatic Permissions Enabled.

Note: The value-specific settings always have priority over the settings made at value list and object type level.
Note: For you to be able to use the automatic permissions after you have updated the document vault from version 7.0 to a higher version, the extended metadata-driven permissions must be manually activated vault-specifically. For vaults created in version 8.0 (or higher), the extended automatic permissions are active by default and their activation is not needed. For more information, see Document Vault Advanced Properties.

Enabling Automatic Permissions

Steps

  1. Open M-Files Admin.
  2. In the left-side tree view, expand the desired connection to M-Files Server.
  3. In the left-side tree view, expand the document vault of your choice.
  4. Still in the left-side tree view, expand Metadata Structure (Flat View) and then select Value Lists.
    The Value Lists list is opened in the right pane.
  5. Right-click a value list that you want to edit and select Contents... from the context menu.
    The Value List Contents dialog is opened.
  6. Select a value list item that you want to edit and click the Permissions... button.
    The Permissions dialog is opened.
  7. On the Automatic Permissions tab, check the Restrict the permissions of objects that refer to this value option check box.
  8. Do one of the following:
    If you want to Do the following
    Use the existing permissions of the value as automatic permissions Check the Use the value's own permissions option check box.
    Use an existing named access control list as automatic permissions Check the Use named access control list option check box and, using the drop-down menu, select a named access control list.
    Define new permissions to be used as automatic permissions In the Name field, type in a name for the permissions, click Add... to add users or user groups affected by these permissions, and check the appropriate Allow or Deny option check boxes on the Permissions list.
  9. Optional: Check the Allow users to deactivate these restrictions option check box if you want to give users the option to disable the automatically set permissions and employ user-defined permissions instead.
  10. Click OK to close the Permissions dialog.
  11. Click Close to close the Value List Contents dialog.

Results

The selected value now has automatic permissions defined. When this value is added to the metadata of an object, the object receives the automatic permissions defined for the value.