Transferring Existing Files to M-Files

Transferring files to M-Files is very easy. Files can be transferred by dragging and dropping or by copying files or folders to the M-Files document vault.

If you transfer one file only, M-Files asks you to fill in a metadata card for the file, which makes the file a document. It is very important to understand the difference between a file and a document. An M-Files document consists of zero or more document files and metadata.

For instance, when transferring a folder with subfolders or several individual files at a time, M-Files is able to preserve the old folder structure. If you wish the folder structure to be preserved, the contents transferred are organized into traditional folders created in the document vault by M-Files. You can fill in the document property data while transferring or later on. For more information, refer to Import Files and Folders.

You can also use existing files directly from their original locations. This way, the additional properties provided by M-Files (such as version management) are available for these files, while they can still be used externally to M-Files. You can add metadata to the documents later on as necessary. For more information, refer to External File Sources.

Different databases can also be used and imported into M-Files. For example, the data in the customer database can be added to the M-Files metadata structure. This way the information does not have to be copied from one location to another. For more information, refer to Object Types and Value Lists.

When you add metadata to documents imported to M-Files, these documents are displayed both in traditional folders and in M-Files dynamic views.
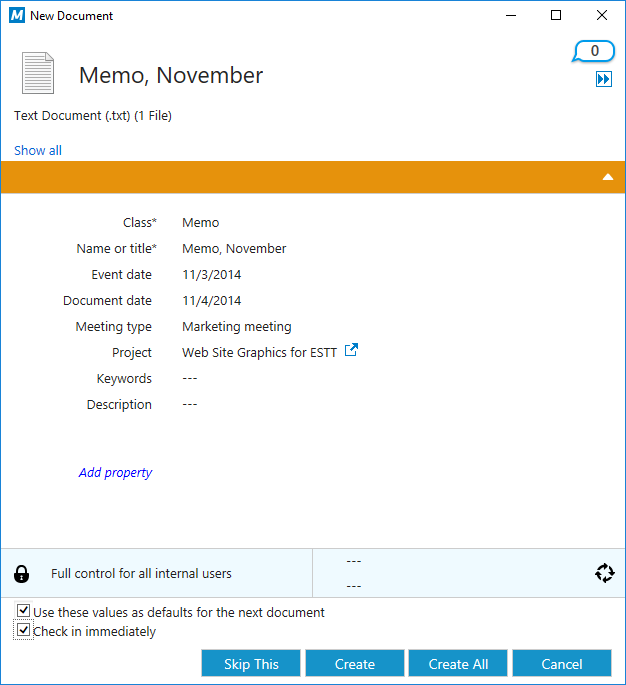
Tip: If you are transferring several individual files with the same metadata, such as the same customer, remember to ensure that the metadata you specify the first time will be used by default for the next files. You can do this when filling in the metadata card by checking the Use these values as defaults for the next document box (see the image below).

New Document window for a multi-file transfer.

Tip: With the Skip This button, you can choose not to transfer a certain file. This is useful if you are transferring a large number of files and notice that you do not want to transfer one of the files after all.

Transferring Files to M-Files by Dragging and Dropping

Steps

  1. Locate a file you need to transfer in File Explorer.
  2. Select the file and drag and drop it to M-Files, onto an empty space in the listing area.
    The New Document dialog is opened.
  3. Select an appropriate class for the file from the Class drop-down menu.
  4. Enter other optional property values.
    Click Add property to add additional properties.
  5. Click Create.

Transferring Files to M-Files by Copying and Pasting

Steps

  1. Locate a file you need to transfer in File Explorer.
  2. Right-click the file and select Copy.
  3. Switch over to the M-Files window, right-click on an empty space in the listing area and select Paste.
    The New Document dialog is opened.
  4. Select an appropriate class for the file from the Class drop-down menu.
  5. Enter other optional property values.
    Click Add property to add additional properties.
  6. Click Create.

Transferring Folders to M-Files by Using the Import Files and Folders Dialog

Steps

  1. In M-Files, press ALT to open the menu bar.
  2. Select New > Import Files and Folders...
  3. Click ... to select the folder you want to import.
  4. Select:
    1. Do not preserve old folder structure to discard the folder structure of the folder you are importing.
      or
    2. Preserve old folder structure to preserve the folder structure of the folder you are importing. You need to select a folder in M-Files for the content to be imported. You can create a new folder by clicking New Folder.
  5. Optional: Uncheck the Prompt for metadata check box if you do not want to add metadata for the content you are importing.
  6. Click OK.

If you checked the Prompt for metadata check box, do the steps from 7 to 9 for every file you are importing.

  1. In the New Document dialog, select an appropriate class for the file from the Class drop-down menu.
  2. Enter other optional property values.
    Click Add property to add additional properties.
  3. Click Create.

Results

The folder is imported to M-Files. If you chose the Preserve old folder structure option, the imported folder appears as a new traditional folder in M-Files.