Creating a new connection to an external source
Follow these instructions to define a new connection to an external source.
-
-
-
-
- Expand Connections to External Sources and then select File Sources.
-
In the , click New File Source to start
creating a new connection to an external source.
Result:The Connection Properties dialog is opened.
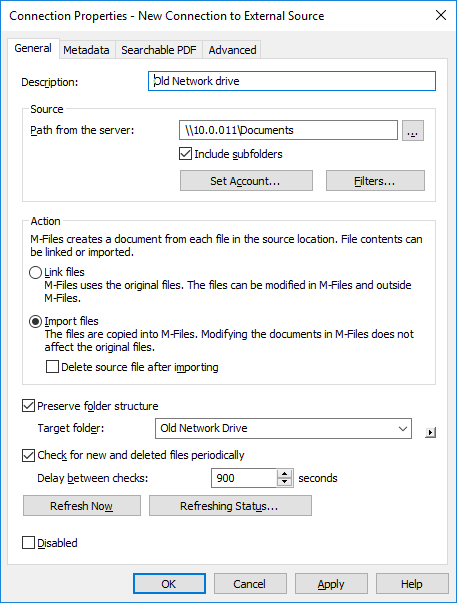
- In the Description field, provide a description for the new connection. You can, for example, describe the external source for which this connection is used.
-
In the Path from the server field, enter the path to the external location
that you wish to connect to . The location can be, for example, a
network drive of a scanner.
The path must be specified from the point of view of the server.
- Optional: Check the Include subfolders check box if you wish to include in the connection the entire folder structure of the specified path.
-
Click Set Account... to specify an account in to be used for processing files from the external location.
By default, uses the server identity (Local System account) as the account.
- Optional:
Click Filters... to define the files to be processed.
- In the Include files that match any of the following filters field, enter the filter or filters for the files that are to be included with this connection.
- In the Exclude files that match any of the following filters field, enter the filter or filter for the files that are to be excluded from this connection.
By default, all files are included except for BAK and TMP files.You may use wildcards to define a filter (for example, *.* or *.docx). Multiple filters are separated with semicolons (;). -
Select either:
- Link files: Select this option to edit the files of
the external source in and externally. Changes made in are shown to external users and changes made outside are shown in . Important: If the vault user group All internal users or All internal and external users does not have edit access to a linked document, the document is deleted from the external file source when it is added to . If this happens, you can copy the file back to the external location by adding edit access to either the All internal users or All internal and external users user group (see Object permissions).
This behavior can be prevented with a registry setting. For instructions, see Preventing Linked Documents from Being Removed.
Note: Normally, only stores the latest external file version. To change this behavior, refer to the article Linked external file source documents only keep the latest file version in .or - Import files: Select this option if you want the files of the
external source to be copied to . Modifying imported documents in
will not have an effect on the original files.
You may also check the Delete source file after importing check box if you want the source files to be deleted after they have been imported to . This option may be useful, for example, when importing scanned documents to .
- Link files: Select this option to edit the files of
the external source in and externally. Changes made in are shown to external users and changes made outside are shown in .
- Optional:
Select the Preserve folder structure check box and in the Target
folder field, enter a target folder for the external files if you wish to preserve the
original folder structure of the external source in using
traditional folders.
You may click the ► (right-pointing triangle) icon to refresh the list of traditional folders or to add a new traditional folder to the vault.
- Optional:
Select the Check for new and deleted files periodically check box if you
want to automatically check the source folder at predefined
intervals and update itself according to which files and folders are new and which have been
deleted. Enabling this option makes any changes in the source folder automatically visible in as well.
- Optional:
You may click Refresh Now to connect to the external source
immediately.
Click Refreshing Status... to display additional information about the process of refreshing the external source.
- Optional:
On the Metadata tab, define the metadata to be added for externally created
objects.
For more information, see Defining metadata for an external file source.
- Optional:
On the Advanced tab, you can specify an alias for the new connection.
For more information, see Associating the Metadata Definitions.
When automatic aliases are in use and you enter a name on the General tab, the Aliases field on the Advanced tab is automatically filled in. The alias has the format <predefined prefix>.<name>. Configure automatic aliases for your vault in Advanced Vault Settings.
- Click OK.