Exporting Content

Note: This content is no longer updated. For the latest content, please go to the user guide for M-Files Online. For information on the supported product versions, refer to our lifecycle policy.

You can use content exporting for long-term archiving of content, synchronization of data among several vaults, or freeing up disk space on the server.

Do the following steps to export content:

  1. Open M-Files Admin.
  2. In the left-side tree view, expand a connection to M-Files server.
  3. Expand Document Vaults.
  4. Expand a vault.
  5. Select Content Replication and Archiving.
    Result:The content replication and archiving features are displayed in the right-side pane.
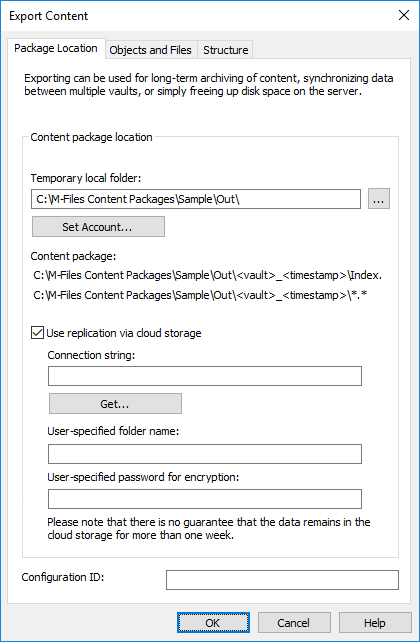
  6. Click the One-time Export... button.
    For information about creating a recurring export operation, see Defining a Scheduled Export.
    Result:The Export Content dialog is opened.
  7. On the Package Location tab, define the location for the content package.
    1. Click the ... button to define a temporary local folder for the content package.
    2. Optional: Click Set Account... to define the user account to be used for saving the content package to the selected local folder.
      You need to use a user account that has write permissions to the selected local folder.
  8. Optional: Still on the Package Location tab, enable the Use replication via cloud storage option to export to a cloud storage location.
    1. In the Connection string field, enter the provided connection string for connecting to the cloud storage.
      If you do not yet have the connection string, click Get... to obtain one. This opens up a preformatted e-mail message to be mailed to M-Files customer support.
    2. In the User-specified folder name field, enter a folder location in the cloud storage that will be used for exporting from one vault and importing to another.
    3. In the User-specified password for encryption field, enter a password of your choice that will be used for encrypting content packages. The same password must be used for exporting and importing the same packages.
  9. Optional: In the Configuration ID field, you can enter any string of characters for identifying this replication job.
    M-Files automatically creates a numeric ID for each scheduled replication job, but you can optionally enter an additional ID for the job to the Configuration ID field. The ID can be any string of characters. If a configuration ID cannot be found when the jobs are processed, M-Files simply uses the numerical replication job ID.
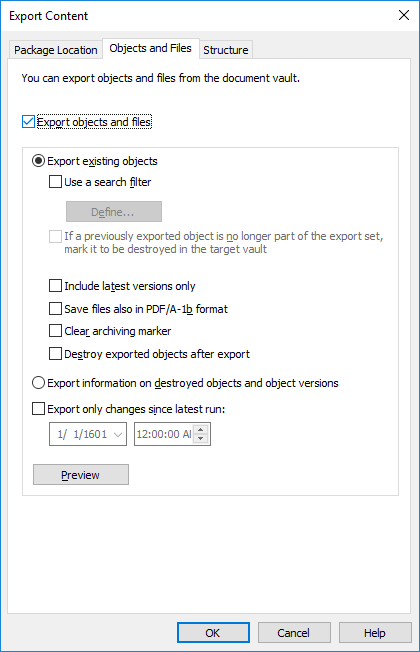
  10. Click the Objects and Files tab.
    Result:The Objects and Files tab is opened.
  11. Enable the Export objects and files option by checking the check box and select the Export existing objects option.
    For more information about the options on this tab, see Export Objects and Files.
    Note:

    If the Export only changes since latest run option is enabled, only the files and objects that are new or have changed since the given date and time are exported. If you are exporting metadata structure elements while this option is enabled, the elements are not exported unless there have been changes made to files or objects.

    Thus if you want to export metadata structure elements regardless of whether objects or files have been changed, it is recommended to do either of the following operations:
    • Export the metadata structure separately.
    • Disable the Export only changes since latest run option if metadata structure elements are to be exported alongside objects and files. Note that if you do not limit the scope of the export in any way, it may take a considerable amount of time to complete the export job.
  12. Optional: To define the conditions that objects must meet to be exported, enable the Use a search filter option by checking the check box and click the Define... button.
    1. In the Define Filter dialog, define the conditions that objects must meet to be exported and click OK once you have defined all the necessary conditions.
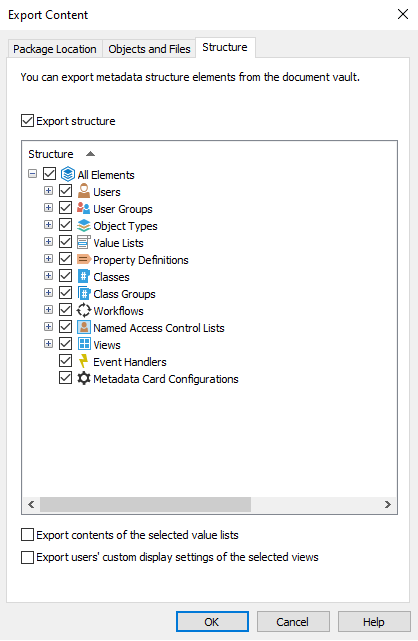
  13. Click the Structure tab.
    Result:The Structure tab is opened.
  14. Enable the Export structure option and either:
    • Check the All Elements option to export all metadata structure elements.
      or
    • Check individual metadata structure elements on the list to define individually the elements to be exported.
    For more information about the options on this tab, see Export Structure.
  15. Click OK to close the Export Content dialog and to start the export.
    Note: Make sure that the export operation is complete before you take any actions in the vault.
When the export operation is complete, you can use the export package to import the exported content to another vault. See Importing Content.