Configuring User Provisioning with Okta

It is possible to provision users and user groups from Okta with the M-Files app integration.

Important information

This is a preview version of the functionality. If you cannot see the necessary configuration options in M-Files Manage, the functionality is not yet available in your M-Files subscription.

When you enable user provisioning in M-Files Manage, all the provisioned users first get the license that you set as the default license type for the provisioned users. This applies also if vault-level user synchronization has been previously used. This means that some users can temporarily get a lower license. You can specify the license type for each user group after the user groups have been provisioned.

With Okta, SCIM is unidirectional, and the changes made in Okta Admin Console are synchronized to M-Files user and login accounts. However, the opposite is not true. Thus, do not use M-Files to make any changes to groups that are provisioned from Okta with SCIM. Changes made to M-Files user accounts will not have any effect in Okta.

Prerequisites

You must have the Subscription admin role in M-Files Manage.

Supported provisioning features

  • Creating users
  • Updating user attributes
  • Deactivating users
  • Group push

For more information about user management in Okta, refer to User management in Okta Documentation.

Configuring User Provisioning in M-Files Manage

To configure user provisioning in M-Files Manage:

  1. Go to Provisioning > Configurations.
  2. In the top-right corner of the Configurations page, click Create configuration > Other SCIM provider.
    If you cannot see this option, the functionality is not yet available in your M-Files subscription.
  3. Enter the necessary information.
    1. In Configuration name, enter a unique name for the configuration.
    2. Select Default license type for the provisioned users. All the provisioned users first get this license. You can change a user group's license type to a higher one after user groups have been provisioned. If there are not enough available licenses of the default license type in the subscription, all the users do not get a license.
  4. Click Save.
    Result:M-Files Manage creates the tenant URL, client ID, and client secret for your configuration.
  5. Click the copy icon () for each piece of data, that M-Files Manage created, and note down the values.
    Note: The client secret is not shown anywhere else when you close the dialog.

    The client secret is necessary to configure user provisioning in Okta Admin Console.

Configuring User Provisioning in Okta Admin Console

This section tells you how to set up user provisioning in Okta Admin Console with the M-Files application from the Okta App Catalog.

The steps to set up Okta in your Okta Admin Console version can be different from the ones that are given here. Refer to Okta documentation for the latest instructions and more information on Okta app integrations.

  1. In Okta Admin Console, go to Applications > Applications.
  2. Click Browse App Catalog.
  3. Find and select the M-Files application.
  4. Click Add Integration.
  5. In the general settings, select Do not display application icon to users.
  6. Click Done.
  7. Go to the Provisioning tab and click Configure API Integration.
  8. Select Enable API integration.
  9. Enter the data, that you copied after you saved the M-Files Manage configuration for user provisioning, to the related fields:
    1. Enter the tenant URL to Base URL.
    2. Enter the client ID to Username.
    3. Enter the client secret to Password.
  10. Click Test API Credentials.
  11. Click Save.
  12. On the Settings pane, select To App.
  13. Click Edit.
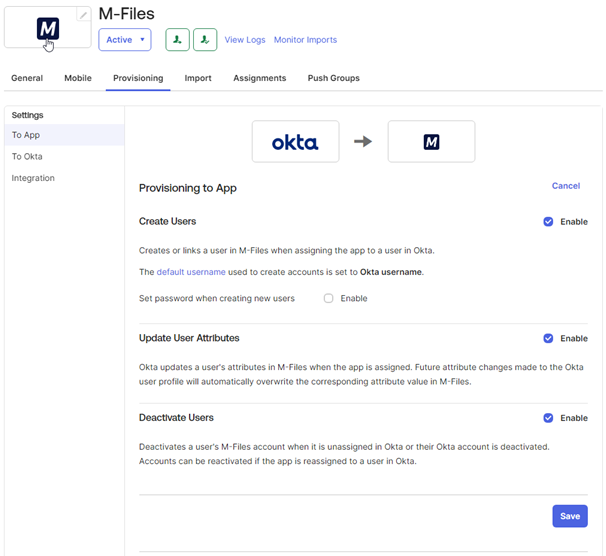
  14. Specify the settings. See the information in the table and the example image.
    OptionEnabled
    Create Users Yes
    Create Users > Set password when creating new users No
    Update User Attributes Yes
    Deactivate Users Yes

    Image of the Provisioning to App settings
  15. Go to the Assignments tab.
  16. Select which users and user groups to provision to M-Files with the Assign drop-down menu.

    If you assign user groups, the group members are provisioned to M-Files, not the group itself. Assign those user groups whose members require access to M-Files.

  17. Enable group push to provision the necessary user groups to M-Files. It is recommended that these user groups are separate from the groups that you assigned. For more information, refer to App assignments and Group Push in Okta Documentation.
    For instructions, refer to Enable Group Push in Okta Documentation.
The user provisioning is now configured, and the provisioning starts automatically.

If there were not enough available licenses of the default license type in the subscription, some of the provisioned users are waiting for a license. You can see the number of users waiting for a license on the Home page of M-Files Manage. In the list of users on the Users page of M-Files Manage, users waiting for a license have a waiting tag in the License type column.
When the user provisioning is complete, you can create links between the provisioned user groups and M-Files user groups in M-Files Manage. For instructions, see Creating Links Between Source and Target User Groups.