Grouping Levels
When you create a view that contains documents or other objects, you can use properties to further group objects in the view. For example, you can create a view that shows documents grouped in folders by customers.
To define a grouping level for a view:
-
In M-Files Desktop, complete one of these steps:
- Navigate to a view for which you want to define a grouping level,
right-click an empty area in the listing area, and then select
Properties.or
- If you want to define a new view, navigate to the location in which you want to create a new view, right-click an empty area in the listing area, and then select New View. For instructions on defining a new view, see Creating a View.
- Navigate to a view for which you want to define a grouping level,
right-click an empty area in the listing area, and then select
Properties.
-
In the Properties dialog of the view, in the
Folder structure section, complete one of these
steps:
- Select a grouping level in the Grouping levels list
and click Add to create a new grouping
level.or
- Select an existing grouping level and click Edit to edit the selected grouping level.
Result:The Define Grouping Level dialog is opened. - Select a grouping level in the Grouping levels list
and click Add to create a new grouping
level.
- Use the Group by drop-down menu to select the object type, value list, or function by which you want to group objects on the selected level.
- Optional: If you selected an object type for grouping the selected level, you can click Define Filter to specify the conditions for including folders in the grouping level. For more information on defining the conditions, see Status-Based Conditions, Property-Based Conditions, File Information Based Conditions, and Permissions-Based Conditions.
-
If you selected an object type for grouping the selected level, use the
Reference direction option to select the metadata
reference direction between the object type of the grouping level and the
objects in the view:
- To <selected object type>: The objects in this
view have metadata that refer to the object type used as the grouping level.
In other words, the reference direction is from the objects in the view
to the object type used as the grouping level (see the example
further below).or
- From <selected object type>: The object type used as the grouping level has metadata that refers to the objects in this view. In other words, the reference direction is to the objects in this view from the object type used as the grouping level. This option is used when the objects in the view do not have metadata references to the object type used for grouping the view (see the example further below).
Note: Views and virtual folders that use property references of the From <selected object type> type cannot be marked for offline availability.The Reference direction selection is dependent on the metadata structure of the vault. As an example, take a look at this graphical representation of a simple vault metadata structure:

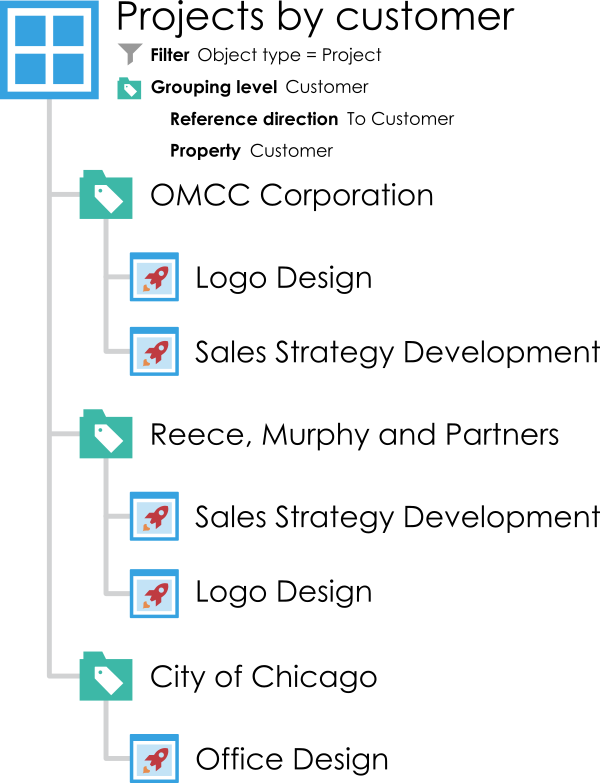
Say that you want to have a view that contains projects grouped by customers. You would then filter the view by the Project object type and add the Customer object type as a grouping level with To Customer as the reference direction because the Project objects in the view refer to the object type used for grouping the view (Customer).

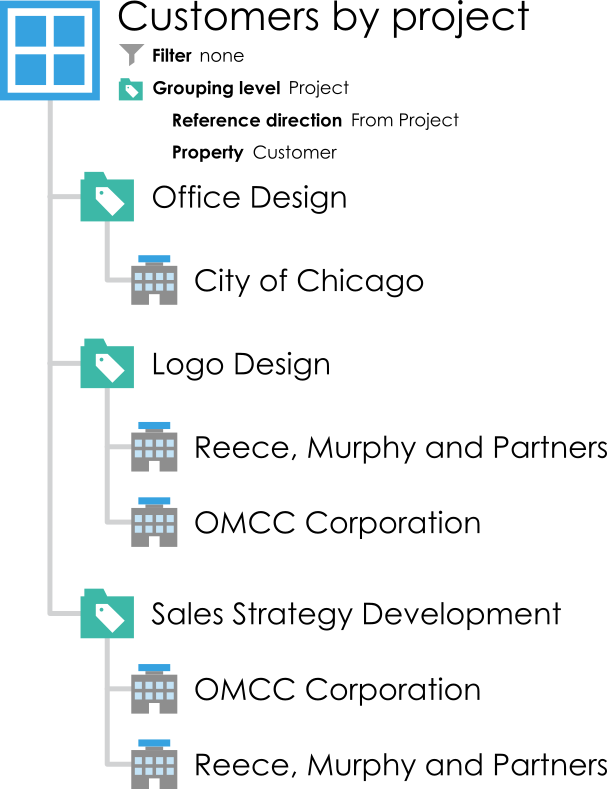
On the other hand, say that you want to have a view that contains customers grouped by projects. The first thing to note here is that the Customer object type does not have any metadata information about projects (as seen in the metadata structure image further above). This means that the reference direction needs to be from the grouping object type, Project, to the Customer objects. So, in this scenario, you would add the Project object type as a grouping level with From Project as the reference direction, and select Customer as the property used by the grouping level object type. Filtering the view separately in this instance is not necessary because the Customer property selected for the grouping level filters the view to contain only customers.
 Note: If you would like to disable the Reference direction setting in the vault, see Disabling the Reference Direction Setting for Grouping Levels.
 - To <selected object type>: The objects in this
view have metadata that refer to the object type used as the grouping level.
In other words, the reference direction is from the objects in the view
to the object type used as the grouping level (see the example
further below).
- Use the Property drop-down menu to select the property that is utilized by the item selected in the Group by drop-down menu. This selection defines the property that you want to group by on this grouping level.
- Optional:
If you selected IntegerSegment() in the Group
by drop-down menu and a property of the Number
(integer) or Number (real) data type in the
Property drop-down menu, in the Segment
size field, define a segment size that you want to group objects
by on the selected grouping level.
Example:If you set, say, 10 as the segment size, objects are grouped into virtual folders by segments 0-9, 10-19, 20-29, and so on. If you set 100 as the segment size, objects are grouped by segments 0-99, 100-199, 200-299, and so on.
- Optional: Check the Show empty folders check box if you want to include empty virtual folders on this grouping level, that is, virtual folders that do not contain any objects because the object on which the virtual folder is based is not referenced by any other object or it does not refer to any other object in the view.
- Optional:
Check the Show objects that have an empty value for this
property check box if you want to include on this grouping level
objects that do not have a value for the property selected in the
Property drop-down menu as the grouping property, and
then select either:
- Show objects on this level: Select this option if
you want to list within the grouping level the individual objects that do
not have a value for the selected grouping property.or
- Show objects in a separate folder: Select this option if you want to list objects that do not have a value for the selected grouping property in a separate folder in the grouping level. In the Folder name field, enter the name of the folder under which such objects are listed.
- Show objects on this level: Select this option if
you want to list within the grouping level the individual objects that do
not have a value for the selected grouping property.
- Optional: Open the Advanced tab to modify the performance options for viewing and accessing the virtual folders in this grouping level. Modifying these settings may be beneficial for views or virtual folders that contain a large number of folders. For more information, see Grouping Level Advanced Options.
- Click OK to finish creating the grouping level.
