Migrating the Vault Database to Microsoft SQL Server

M-Files uses Firebird as the default vault database engine. For vaults that contain several hundreds of thousands of objects, we recommend you to use Microsoft SQL Server. If a vault uses Firebird but the number of objects in the vault greatly increases, it can be beneficial to have the vault use Microsoft SQL Server as the database engine instead. You can migrate your vault database from Firebird to Microsoft SQL Server in M-Files Admin.

Note: You can only migrate the document vault database engine from Firebird to Microsoft SQL Server. Migrations from Microsoft SQL Server to Firebird are not supported.
After the migration, the file data location is the same as with Firebird. If you want to change the file data location before or after the migration, do these steps:
  1. Take the vault offline.
  2. Move the file data to a different location.
  3. Specify the location of the vault file data.
  4. Bring the vault back online.

To migrate your vault database from Firebird to Microsoft SQL Server:
  1. Open M-Files Admin.
  2. In the left-side tree view, expand a connection to M-Files server.
  3. Right-click a vault.
  4. Click Operations > Take Offline.
  5. Click Yes to confirm that you want to take the document vault offline.
  6. Optional: It is recommended that you back up the document vault at this point.
    For instructions on backing up the document vault, see Backing Up a Vault.
  7. In the left-side tree view, right-click the vault again and select Operations > Migrate to Microsoft SQL Server from the context menu.
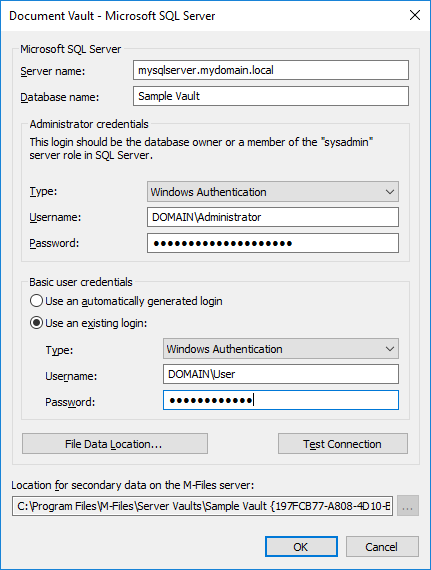
    Result:The Document Vault - Microsoft SQL Server dialog is opened.
  8. In Server name, enter the connection address to your Microsoft SQL Server, such as mysqlserver.mydomain.local.
  9. In Database name, enter the name of the database to be created for the vault.
    It is recommended to use the same name as the vault has on M-Files Server.
  10. In the Administrator credentials and Basic user credentials sections, fill in the credentials in one of the two following ways:
    OptionSteps
    Enter the credentials for a login that has the sysadmin server role on your Microsoft SQL Server, giving M-Files Server the rights to make the necessary migration-related operations.
    1. In the Administrator credentials section, enter the credentials for a login that has the sysadmin server role on your Microsoft SQL Server.
    2. In the Basic user credentials section, select the Use an automatically generated login option.
    Manually create the Microsoft SQL Server database and login accounts (without the sysadmin server role) and use the non-sysadmin credentials for M-Files Server.
    1. By using Microsoft SQL Server Management Studio, create an empty database for the vault.
    2. Still in Microsoft SQL Server Management Studio, create two login accounts without the sysadmin server role, for example User A and User B.
    3. Back in M-Files Admin and the Document Vault - Microsoft SQL Server dialog, in the Administrator credentials section, enter the credentials for User A.
    4. In the Basic user credentials section, first select the Use an existing login option and then enter the credentials for User B.

    The easiest way is to select the first option, and to let M-Files Server make all the necessary changes on your Microsoft SQL Server. In some cases, however, system administrators may need to withhold Microsoft SQL Server sysadmin credentials from M-Files Server. In these cases, the vault database and the Microsoft SQL Server login accounts need to be created manually (the second option). For detailed instructions, refer to the document How to Configure M-Files to Operate Without Sysadmin Role in MS SQL Server.

    M-Files Server uses the basic user credentials for almost all vault operations, and the administrator credentials – in addition to creating the database and the login accounts – for some of the maintenance operations.

  11. Optional: Click Test Connection to test the connection to your Microsoft SQL Server.
  12. Click OK.
    Result:A warning dialog is opened to tell you that the operation cannot be undone.
  13. Click Yes to close the warning dialog and start the migration.
  14. After the migration is complete, in the left-side tree view, right-click the vault.
  15. Click Operations > Bring Online.
Once the migration process is complete, the database of your M-Files vault is located on the Microsoft SQL Server that you specified.
After migrating the vault database to Microsoft SQL Server, you need to create a backup job for the database in Microsoft SQL Server Management Studio. For more details and recommendations, see M-Files Backup Policy.